• THIS IS THE 25th ANNIVERSARY YEAR FOR THE LES PAUL FORUM! PLEASE CELEBRATE WITH US AND SUPPORT US WITH A DONATION TO KEEP US GOING! We've made a large financial investment to convert the Les Paul Forum to this new XenForo platform, and recently moved to a new hosting platform. We also have ongoing monthly operating expenses. THE "DONATIONS" TAB IS NOW WORKING, AND WE WOULD APPRECIATE ANY DONATIONS YOU CAN MAKE TO KEEP THE LES PAUL FORUM GOING! Thank you!
  • Please support our Les Paul Forum Sponsors with your business - Gary's Classic Guitars, Wildwood Guitars, Chicago Music Exchange, Reverb.com, Throbak.com and True Vintage Guitar. From personal experience doing business with all of them, they are first class organizations. Thank you!

Need Help Replacing '04 Classic 1960 Les Paul Inlays

Bruce R

Well-known member
Joined
Mar 2, 2007
Messages
1,100
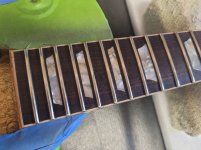
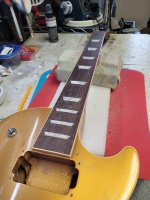
I just picked up an '04 Classic 1960 Goldtop that was being worked on. I am interested in any info I can get from anyone who has replaced the fret inlays. Mine are what as commonly known as the 'snot-colored' ones, so this really bothers me. Unfortunately, this guitar had just been refrettted, so I know this makes it tougher.

Any tips, advice, or opinions are welcome1000003448.jpg
 

fred dons

Active member
Joined
Jul 20, 2001
Messages
347
i have done it several times with classics, I drill a hole in the middle of the inlay (a mm deep) score the parameter of the inlay with an exacto knife and then lift the inlay with a small screwdriver or chisel through the hole in the middle. The inlay will most likely break into smaller parts during the process. I replace them with more historic correct ones and they tend to have sharper edges which means that either with the small chisel or the exacto knife, I have to cut sharper corners on the top of the trapeze shape, just cut small slivers at a time. once removed you will noticed that gibson uses a hideous yellow glue to glue the inlays down, i try to scrape as much away as possible, again using the exacto knife. Once the cavity is clean I first testfit the new inlays, place them on top of the cavity, score around them with an exacto knife to make sure there is no excess wood left. Then I glue them in using superglue, any gaps I fill using rosewood dust while the glue is still wet. once dry, i use a small flat file to "sand" the inlay more flush with the fingerboard, and lastly I sand it with 600 grit sandpaper. I takes me about an hour to do a single fingerboard.
 

Bruce R

Well-known member
Joined
Mar 2, 2007
Messages
1,100
Where did you get the inlays, StewMac?

How thick are the existing ones? I have seen replacements at 0.06" (StewMac) and 0.075" (Retrospec).
 

fred dons

Active member
Joined
Jul 20, 2001
Messages
347
the original gibson yellow ones are slighly thinner, I'm not afraid to use my dremel to route the cavities a bit deeper but if this is your first I would not do this on an expensive guitar, the new inlays will a hair higher than the cavity which is why you need to sand/file them down and follow the fingerboard radius. btw you can sand these just like you would sand real mother of pearl ones, the figuring will not dissapear.
finally, you need to oil/wax the fingerboard completely afterwards to avoid the fingerboard color being different in the parts you did sand because of the inlays
 
Last edited:

Bruce R

Well-known member
Joined
Mar 2, 2007
Messages
1,100
the original gibson yellow ones are slighly thinner, I'm not afraid to use my dremel to route the cavities a bit deeper but if this is your first I would not do this on an expensive guitar, the new inlays will a hair higher than the cavity which is why you need to sand/file them down and follow the fingerboard radius. btw you can sand these just like you would sand real mother of pearl ones, the figuring will not dissapear.
Thanks for this information. I would be curious to know what thickness the original Classic 1960 (greenish) inlays are? It looks like I would have these different thicknesses & cuts at my disposal;

0.04" Bartlett "Vintage" Spec
0.050" Stewmac Mother-Of-Pearl for Les Paul Standard (flat)
0.060" StewMac "Pearloid" (flat) (currently unavailable)
0.70" CrazyParts "Historic" Cut
0.075" Retrospec & Crazyparts "Vintage Spec Cut"
0.078" Philadelphis "Pearloid" white-backed (cheap, at $17)


Apparently, the gent at Strange Guitar has an excellent account of doing the same thing to another Classic. Thin, greenish original inlays to start with, so he ended up doing a lot of sanding to take the new inlays down to the fretboard.
 

fred dons

Active member
Joined
Jul 20, 2001
Messages
347
it is "safer" to file and sand them down, especially if you need a bit of filler as well, as that will make sure the inlay is flush with no visible gaps.
To be honest I can't remember how thin the classic inlays are but they were thinnner than the bartlett and crazyparts ones , if you would route the cavities deeper using a dremel you will create a radius in the cavity as the router will follow the radius of the frets, which in turn creates the risk that the inlays might pop up again at a later stage due to the tension of gluing a flat inlay into a radiused cavity. Btw I prefer the Bartlett and Crazyparts inlays over the others as they are vintage correct
 

c_wester

Well-known member
Joined
May 9, 2002
Messages
2,303
I heated mine with a soldering iron.
But this is along time ago, but I think they poped right out.

And you use rosewood dust mixed with the glue if the new inlays dont line up with the "holes".
 
Last edited:

Bruce R

Well-known member
Joined
Mar 2, 2007
Messages
1,100
I heated mine with a soldering iron.
But this is along time ago, but I think they poped right out.

And you use rosewood dust mixed with the glue if the new inlays dont line up with the "holes".
Great advice, and I took it! The soldering iron did the trick, I mainly melted the middle of the inlays and most of it popped right out when I pried it with a small screwdriver. The toughest part was chiseling the glue left in the pocket, it was a long & slow process.
 

jb_abides

Well-known member
Joined
Apr 6, 2005
Messages
7,035
@Bruce R

Which new inlays did you end up procuring, and how's the fit and thickness?

What was required to make them install nicely?

Maybe you are not there yet... keep us posted!
 

c_wester

Well-known member
Joined
May 9, 2002
Messages
2,303
Great advice, and I took it! The soldering iron did the trick, I mainly melted the middle of the inlays and most of it popped right out when I pried it with a small screwdriver. The toughest part was chiseling the glue left in the pocket, it was a long & slow process.

Well done!!!
 

Bruce R

Well-known member
Joined
Mar 2, 2007
Messages
1,100
@Bruce R

Which new inlays did you end up procuring, and how's the fit and thickness?

What was required to make them install nicely?

Maybe you are not there yet... keep us posted!
I ended up with the generic Pearloid, white-backed inlays from Philadelphia Luthier, only 16.99 a set. I am sure the higher cost 'vintage-looking' Historic ones would've been cool, but it didn't matter to me for this project.
The thickness of inlays was .078, which was all needed for sanding to match the radius of the fretboard. After reading something saying it made them look "richer" I did sand off the white paint on the back of the inlays. Can't say I see any difference, but thought I'd mention it.
Once I got the guitar back from the fret installation I thought I would try 'aging' them with a secret method I came up with. I had an old can of amber nitro hanging around, so I sprayed a bit into a rag and rubbed it into the inlay, quickly wiping it off. I also do this to green plastic Kluson tulip tuner buttons, after lightly sanding them to buff the surface a bit, making sure to wipe before they dry.
Hats-off to my tech, Trevor Lindsey, for the extra work he did on the fretboard. He did some real magic to get it looking this nice.
 

Attachments

  • 20250219_170600.jpg
    20250219_170600.jpg
    103.6 KB · Views: 34
  • 20250216_165934.jpg
    20250216_165934.jpg
    361.4 KB · Views: 32
Last edited:

Hamerfan

Active member
Joined
Dec 20, 2004
Messages
813
A bit late to the party. I did the change about 10 years ago. I ordered historic correct ones at Historic Makeover from Kim LaFleur (RIP Kim). They were considerably thinner. I cleaned the routes to the wood and cut veneer to shim it up. With some filler i glued them in with super glue. The filler was quite handy to fill the gaps. Scraped it with a cutter blade fitting the radius.
 

Bruce R

Well-known member
Joined
Mar 2, 2007
Messages
1,100
A bit late to the party. I did the change about 10 years ago. I ordered historic correct ones at Historic Makeover from Kim LaFleur (RIP Kim). They were considerably thinner. I cleaned the routes to the wood and cut veneer to shim it up. With some filler i glued them in with super glue. The filler was quite handy to fill the gaps. Scraped it with a cutter blade fitting the radius.
In my instance the first two inlays had a bit more radius on the sides, prompting me to add filler comprised of rosewood powder/dust mixed with super glue. I was glad the inlays I got were about as thick as they come, as I didn't want to bend them over filler. I saw a set of inlays from HM (Kim) and they are spot-on in appearance.
 

bern1

Well-known member
Joined
Nov 23, 2004
Messages
1,317
Looks good Bruce! Damn, are you sure you don’t miss the old inlays? Man, that was a sick snot color! It all worked out when you called the doctor and made it all better……
 
Top